Disclaimer: It should go without saying, but we’re going to say it anyway because some people just don’t think before they act. Please, don’t be that person. Make sure you actually clear your weapon out before you start disassembling. We say this because there are people who’ve failed to do this and end up shooting a bullet through their foot because they “thought the weapon was cleared out.” Don’t think, be certain. Clear your weapon out! This means checking the magazine well AND the chamber. Just because you dropped your mag doesn’t mean the weapon is cleared out. If you’ve chambered a round, it doesn’t magically fall out with the magazine. And just because the magazine isn’t inserted, it doesn’t mean you can’t shoot the round that’s still hanging out in the chamber. Again, don’t be stupid. Don’t assume. Clear the weapon out completely!
We’re launching a new series of blogs; this time, it’s on custom builds—everything from building rifles to pistols and even conversion kits. If you’ve ever been interested in any of these options, you first need to know what you’re looking at.
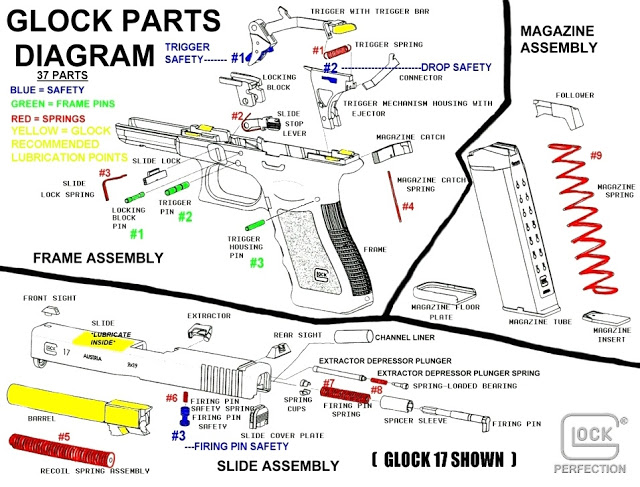
Unfortunately, many people out there want to do a build or conversion, but they don’t know the basic parts of their firearm. What’s a guide rod, where is the locking block, what comes with a recoil spring assembly?
If you don’t know the parts required to build a particular firearm, it will be challenging to make sure you’re doing it correctly. This blog is an overview of the various components found in pistols, such as a Glock (which I’ll be using as an example).
Once you know the basics, you can start looking into custom slides, sights, triggers, pistol grips, etc.
Lower Reciever
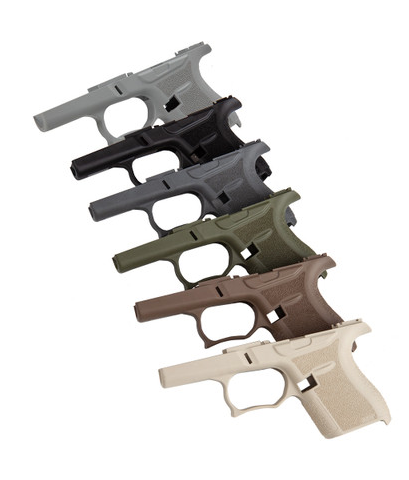
It helps to know what each part is; that way, if something breaks, you know what part needs replacing. This puts the power in your hands instead of relying on someone else. A piece you could purchase and replace yourself for less than $2 will cost more because now you’re paying a labor fee. Of course, there will be times when the work you need done is too advanced, but when it’s something as simple as replacing the recoil assembly, you want to be able to do that yourself.
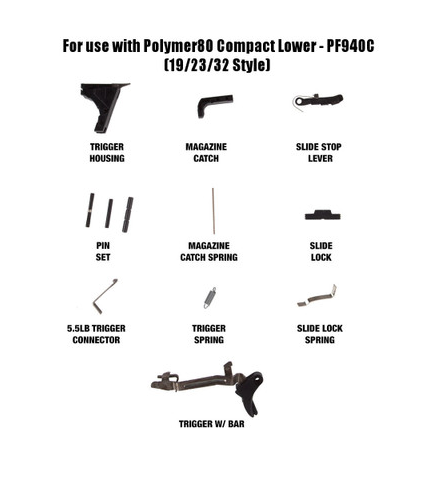
Now, if you want to go into custom builds, you need to know this information too, so you know what parts are needed and have the opportunity to do a fully custom build. It makes it much easier when you start shopping around.
Of course, you need to keep in mind; not all parts are compatible with every gun. What works in a Glock 19 might not work in a Glock 17. Everything under this heading will point out the various parts you might find in the lower receiver. Again, I’m using a Glock as my example. In some weapons, some of the parts are found in the upper receiver (i.e., the locking block in a Beretta M9).
Trigger Guard
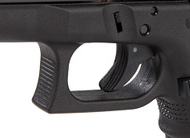
This part is just what it sounds like; it’s a guard for your trigger. The trigger guard helps protect the trigger from being fired unintentionally.
Trigger Housing with Ejector
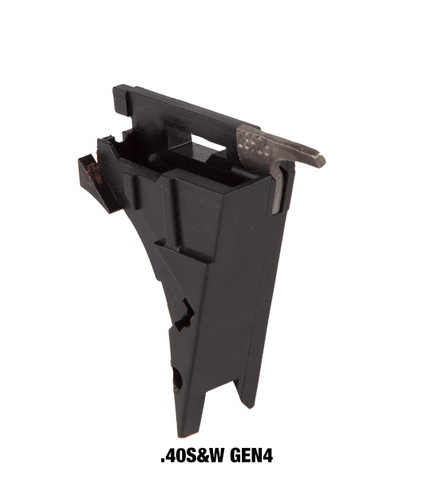
This is where your trigger lies, a little house for your trigger. The point of having trigger housing is for mounting your trigger. Some trigger housings come as a unit, such as with Glock’s trigger housing and ejector combination.
Locking Block
The locking block, also referred to as the striking block, is found in the lower receiver of a Glock. It intends to make sure the slide and barrel move securely.

For those used to the military-used (Army and Air Force are going away from it) M9 Beretta, the locking block is in the upper receiver and sits under the breach. Glock builds differently, so this is just one of many examples as to why it’s essential to make sure all your parts are compatible with one another.
Pin Set

A pin set comes with a variety of different pins if we’re talking about a Glock. For example, you’ll probably end up with a pin for the locking block, trigger, and trigger housing. These pins keep everything secured. For instance, the pin for your trigger housing keeps your housing from accidentally getting pulled out when taking the weapon apart.
Trigger Connector
If you’ve shot more than one pistol, you’ve probably realized that some triggers are more difficult to pull than others. This is because of the trigger connector’s responsibility of regulating the resistance you’re feeling when pulling the trigger.

If you want something with a lighter trigger pull, you should get a trigger connector that decreases the weight. If you want something heavier, find a trigger connector that increases your trigger pull weight. This is one of those things that’s based on personal preference and intended use.
Magazine Catch
This is the part of your pistol that catches your magazine, kind of self-explanatory if you’re used to operating handguns. This piece makes sure your magazine locks in place, and it also lets you easily drop the magazine for a reload. When you purchase your firearm, this is a piece you want to pay attention to, especially if you’re a left-handed shooter like myself.

If you’re trying to build a Glock, they even offer an extended magazine release button, which makes the button stand out a little more, resulting in an easier find and hopefully shaving a few milliseconds off your reloading time.
Magazine Catch Spring

This spring gives your magazine catch some resistance.
Trigger with Bar
Triggers are not created equal. If they were, they’d all be the same, and you wouldn’t have triggers for various types of shooting. So, believe it or not, your trigger can change a lot about your shooting. The lighter the trigger pull, the easier it will pull because it doesn’t take as much effort.

If you’re aiming to shoot competition style, a lightweight trigger is probably what you want to look into. Again, not all triggers are created equal, so make sure you shop around a little.
As far as the attached bar goes, it’s the part that pushes your firing pin safety up. When this happens, it frees the firing pin from the firing pin channel. This is a part of Glock’s firing pin safety features.
The trigger bar “rests on the safety ramp within the trigger mechanism housing. The trigger bar engages the rear portion of the firing pin and prevents the firing pin from moving forward. As the trigger is pulled rearward the trigger bar lowers down the safety ramp and allows the release of the firing pin. After firing, the trigger bar moves upward and re-engages the firing pin. As the trigger is released, all safeties automatically reengage.”
-Glock, Safety Action System
Slide Stop Lever (Slide Lock)

Depending on the type of handgun you’ve purchased, the slide lock, as commonly referred to, can determine how easy it is to lock your slide to the rear and release it. Some pistols have an easy-to-use slide lock, while others require a little extra “muscle.”
Slide Lock Spring

And here we have your slide lock spring. For your slide stop or slide lock to work correctly, it has to have a good spring in it. The slide lock spring places pressure on the actual slide lock and helps to keep the slide lock aligned. If it’s set properly, there should be some tension when pressed.
Pistol Grip
Yes, even the grip can be replaced on your pistol. Depending on your preference, use, and even the size of your hand, you might choose one grip over the other. There are enhanced grips, such as those found using grip tape. There are factory-made rubber grips and extended grips.
Some grips are smaller than others, which work great for people who have smaller hands and need to both hold the weapon and still reach the trigger. And then there are larger grips that work great for people with larger hands who can’t get a proper grip on something too small.

If you’re looking for a grip that works for you, consider walking into a store and getting a feel for what does and doesn’t work. You don’t want something too small or too big for your hands, but you also don’t want something that will fall out of your hands when you get sweaty.
If you’re interested in seeing how these parts work together, check out this handgun animation.
Upper Reciever

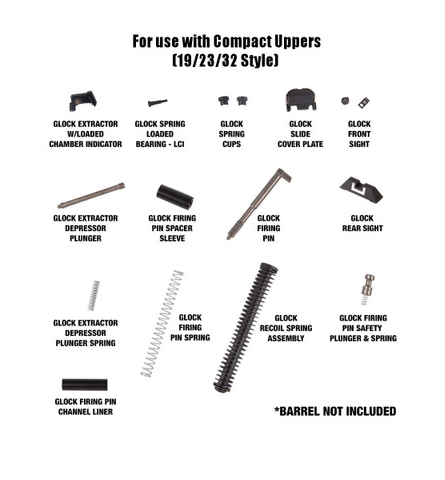
The upper receiver is the top half of your pistol. Things like the sights, barrel, firing pin, etc., are all a part of your upper receiver. Let’s dive in!
Barrel

I have a feeling most of you reading this know which part of the gun this is. But that doesn’t mean I won’t cover it really quickly. The barrel is the part the bullet goes through before leaving the pistol.
Barrels are created differently. If you’re building a .45, you don’t want to purchase a barrel that’s intended for a 9 mm. This is how people lose their hands.
If you’re building a custom pistol or just changing the barrel out, make sure it’s the one intended for the ammo you’re going to be firing.
The barrel must be compatible with your intended build and your ammo. I’ve seen what happens when people put the wrong sized round in both pistols and rifles. Luckily, no one had any significant injuries, but trust me, it wasn’t worth it.
Extractor with Chamber Indicator
These parts do a couple of things. The extractor extracts the round from the chamber after you’ve pulled the trigger, and the chamber indicator lets you know if there’s a round in the chamber.
Now, I know earlier, I said make sure you check the chamber as proper clearing procedures require it. Simply looking at the chamber indicator is NOT properly clearing your firearm.

The chamber indicator is good for letting you know there is a round in the chamber when you’re in the heat of battle, so you don’t have to rack the slide back, just to be sure.
It is not an indicator to determine if your chamber has been properly cleared out. Make sure you physically look inside the chamber. Look from where the bullet ENTERS [breach] the chamber, not where it exits [muzzle].
Spring Loaded Bearing
There are two types of spring-loaded bearings. The first is an LCI, which stands for Load Chamber Indicator, and then there’s a Non-LCI, meaning there’s no Load Chamber Indicator.

Now, I’ve already told you what a chamber indicator is, so you shouldn’t be lost there. But, where does the spring-loaded bearing come into play?
Basically, this bearing provides tension on the spring and makes your extractor do its job as it should. Without the bearing, you wouldn’t have tension, and the extractor wouldn’t work correctly.
Spring Cup
If you’re working with a Glock, as we’re using for this example, you should have something called a spring cup. The point of this cup is to help protect the channel for your firing pin. The cup allows any water present to flow around your firing pin—if you were to submerge it in water, for instance.

However, just because it helps water flow around the firing pin, it doesn’t mean gunk doesn’t stay in there. When you’re done dropping your pistol in ponds and puddles, make sure you thoroughly clean your firing pin assembly and channel.
Extraction Depressor Plunger and Spring

The extractor depressor plug is intended to take the force created by your extractor spring and transmit it. This transmission causes the extractor to rotate. When this happens, the extractor grips the rim of your cartridge so it can be expelled.
Firing Pin Spacer Sleeve

The firing pin spacer sleeve is meant to be installed onto the firing pin. This is different from a firing pin channel liner, which I’ll get to here in a few.
Remember, some parts are specific to different weapons. This is one of those parts. So, if you want to go and build a custom handgun, make sure you research the parts needed for that specific gun and model.
You can typically find kits that have everything you need. But, if you want to forgo a kit, again, do your research so you’re not building a paperweight.
Firing Pin Channel Liner
As I said above, the firing pin channel liner is different from the spacer sleeve. You’ll notice as you field strip pistols, they all have unique qualities and parts. Glock, for instance, has a firing pin channel liner. Something you don’t see in your standard Beretta M9 or the .45 ACP 1911, or even all Glock models, such as the Glock 42 or 43.

Now, if you’re sitting there wondering what the purpose of a firing pin channel liner is, wonder no more. Most people don’t even know there’s a liner in their Glock. That’s because it’s a part that typically stays put (inside the slide) and is NOT removed when taking the firing pin out.
Glock uses this part because they noticed the firing pin and the slide having a significant amount of wear. The plastic helps prevent the wear caused by friction, but it also serves another purpose: to help guide the firing pin.
This small little channel liner guides the firing pin through the slide, and it makes sure the firing pin blade comes out of the breach face in the same spot every time.
Again, this part is not intended to come out, even when doing a complete field strip. Really, the only reason you should take this part out is if the weapon is going under some customization that requires machining/heating that would damage the plastic piece.
If it does come out or it’s taken out, for any reason, there’s a small tool you can use to place it back in the slide (or you can search a Glock forum and find some other methods people use).
Slide Cover Plate

If you didn’t know, Glock has custom slide cover plates. My brother has a “Don’t Tread on Me” cover for his. This is just a really cool way to add some custom visuals to your pistol.
However, it has a purpose, too, other than customization. The slide cover plate holds your firing pin and extractor plunger assembly in place.
Front and Rear Sight

I wrote an entire article about sights, fixed, adjustable, night, etc. And just like I explained in that blog post, there are so many sights to pick from. When it comes to your pistol, you can keep the factory set sights or get something that works for darker settings, such as tritium sights.
Firing Pin and Spring

Your firing pin is what makes your weapon fire. You might hear about people who take the firing pin out in a case of emergency to prevent the enemy from using the weapon. That’s because, without a firing pin, your pistol won’t work. You need a firing pin to strike the primer and make the pew pew happen.
Firing Pin Safety Plunger Spring

The firing pin safety plunger spring is intended to help reduce tension created by the plunger itself when pulling the trigger. You’ll typically get the firing pin safety plunger and the spring as a package deal.
Recoil Spring Assembly

A recoil spring assembly comes with the spring and guide rod. The guide rod goes through your spring and sits in the upper receiver. The point of this assembly is to help reduce muzzle flip.
There are a variety of guide rods and spring weights to choose from when doing a custom build.
Glock Conversion Kits
The above doesn’t even get into conversion kits. Did you even know Glock had conversion kits? They do. We won’t get too deep into that here, but my counterpart did in his blog: Glock Pistol Conversion Kit.
For now, know that pistols don’t typically stop at their factory-built look. There are so many things you can do to them. Changing out the uppers, putting on tritium sights, and even getting yourself a KPOS Scout Conversion Kit for Glock 17/19 from Fab Defense.
Your options are pretty expansive. And if you’re going for a KPOS Scout Conversion, make sure you’re up to date on all NFA regulations.
Conclusion
It’s pretty easy to build a custom pistol. You can go out and buy a gun and just start replacing parts for upgraded ones. Or you can begin buying upper and lower receiver kits. Or, if you want complete customization, you can order pieces individually. However, make sure your parts are compatible. I highlighted parts found in some Glock models. What fits in one model might not fit in the next. What works in your Beretta might not work in your XD, Glock, etc.
Again, the above is just some basic information. We’d be here forever if I listed every part unique to each weapon system. This article was written to simply help give you an idea of parts you might find in your pistol. Some are specific to Glock, which is the example I chose (simply because there’s a lot of Glock fans out there, and it’s often the go-to for those wanting to purchase their first gun.)
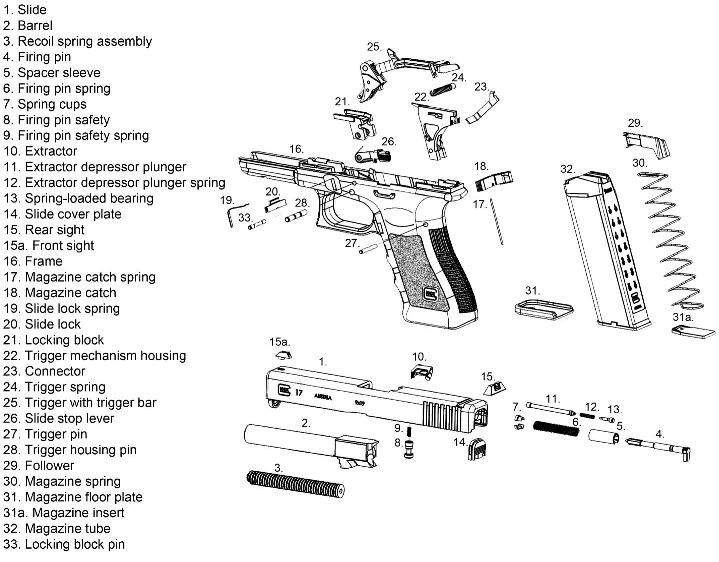
Of course, this could have become much more detailed, but we’re already over 3,000 words, and I know you’re tired of reading. Personally, I’m tired of writing—don’t tell the boss. 😎
If you’d like to add further details about these parts or add parts I failed to mention, please feel free to add them in the comment section below.
Did we miss anything? Do you have further recommendations? Please, comment below. We love hearing from our readers!
Looking for more content? Check out some of our other stuff!
Glock 35| Authoritative Review of the Competition Shooter





Leave a Reply
Your email address will not be published. Required fields are marked *