
If you aren’t getting some good quality trigger time in at the range, then what are you doing with your life? Seriously though, what are you doing? If you’re looking to improve your range day, look at these five pistol drills to try next time you’re ready to send some brass flying.

Weapon Safety
Before we get into the fun stuff, know that in all firing scenarios, safety is paramount. So, adhere to these safety standards at all times:
1. Always keep the gun pointed in a safe direction—don’t aim at your cat, dog, sibling, anything that might have a person behind it, or your pet turtle—only point at the things you intend to shoot, and nothing more.
2. Always keep your finger off the trigger until ready to shoot—you will not look cooler by having your finger in the trigger guard, even if there aren’t any rounds in the chamber. So always practice like you play, and don’t be an idiot.
3. Always keep the gun unloaded until ready to use—if you aren’t planning to use the gun, don’t load the gun. Too many people get excited and the next thing you know, there’s a nice .45 caliber sized hole in the ceiling of the shooting range, which goes back to always keeping your gun pointed in a safe direction.
4. Always. Always. Always know what’s behind your target and beyond it. If you’re shooting at a target and don’t know what’s behind it, your chances of going to jail have increased drastically. For all you know, there’s a playground full of small children behind your target, so again, don’t be an idiot.
5 Pistol Drills
Again, with each of these drills, don’t be stupid and mind your weapon’s safety. Also, keep in mind, that some of these drills can’t be done at every range. Make sure you speak with your range’s safety/range officer beforehand.
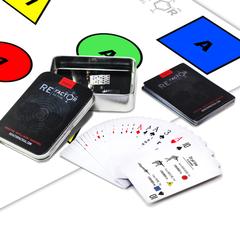
Dead Man’s Hand Shooting Deck Drills
These decks come in two forms, one for the rifle and one for the pistol. For this particular post, we’re going to stick strictly to the pistol version—don’t get upset, we’ll give you some good rifle drills later on too—this is just the first step in making you an intelligent shooter, at least with the pistol.

What you need:
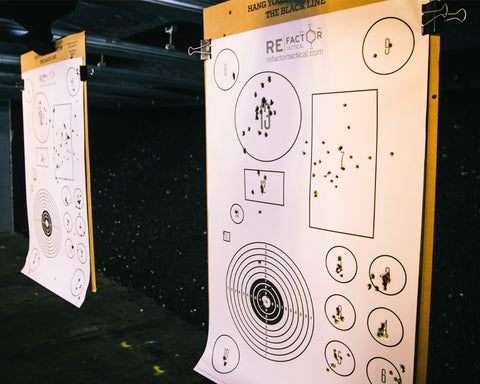
- IQ Target (Pistol)
- Dead Man’s Hand Shooting Deck (Pistol)
- As many rounds as you can stand to shoot in one day
- A few magazines (for reloads)
- Between 3 and 25 yards of range
How it works:
Picture this, you’re at the range, it’s a beautiful sunny day, great for absolutely destroying some targets. But wait, you’re bored and think to yourself, “Wouldn’t it be nice if I could be more creative with my range time?” Well lucky for you, we’ve created an awesome drill that brings creativity to an entirely new level.
First, go set up your IQ target, then take out your deck of cards—no, not the ones you played poker with last night— and either at random or based on your current skill level you’ll draw a card.

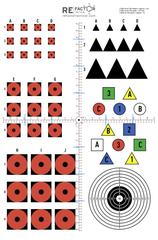
Be advised, that this card game comes with every shooter’s skill level in mind. If you need a warm-up or need to work on the fundamentals, only draw from the cards with a 2-7 on it. If you want to work on performance and speed, draw from the cards with 8s and 9s on them. If however, you’re ready to work on advanced marksmanship fundamentals, select the 10s. Now let’s say you want to get fancy, the Jacks are your cup of tea. With safety in mind—as always—jacks are facing movements combined with shooting. Finally, you have the cards meant for the more advanced shooters. Queens and Kinds are complex drills, Aces are complex drills incorporating movement. So, depending on what skill level you’re at, draw from that particular stack—or complete randomness—and do what the card says.
For example, if your card says, shoot at all the shapes with a number in it one time, that’s what you’ll do. You’ll be thinking, attempting to find your next shape with a number in it, and you’ll also be working on your precision—because you’re nothing if you’re hitting the triangle with a “1” in it when you’re supposed to be hitting the circle with a “2” in it.
General Marksmanship Drill
We’ve talked about targets to help increase your marksmanship in previous posts, now it’s time to start practicing with marksmanship drills.
What you’ll need:
- Essentials Target
- At least 6 rounds, more if you don’t completely suck
- Between 3 and 7-yards of range
How it works:
This particular drill is to make you focus on the fundamentals, so in this case, the drill is not timed. Your goal is to make well-aimed hits with every shot. You’ll start by firing one round each at the circles labeled with a 1-6 from the 3-yard line. If you do that successfully—meaning you hit inside each circle—you’ll do it again, only this time with two rounds to each circle. You’ll continue this process until you finally miss. If however, this is too easy for you, you can move back to the 5 or 7-yard line and perform the same steps.
X’s and O’s
What you’ll need:
- Essentials Target
- 45 rounds
- 5-yards of range
- Timer
How it works:
From the 5-yard line, in the gun-ready position, at the sound of the buzzer, you will fire one round each into target #13, followed by #8, #13, #9, #13, #10, #13, #11 and #13, in that order 5 times. The point of this drill is to help you work on your target transition skills by making you move to a different position between each shot.
In the end, record your time and attempt to improve your speed each time you conduct this drill.
Abbate Drill
What you’ll need:
- Essentials Target
- At least 18 rounds, more if you want more running-range fun
- Between 3 and 25-yards of range
- Timer

How it works:
For this drill, you will start at the 3-yard line with your pistol holstered. When the buzzer goes off, you’ll fire one round each into targets 1, 2, 3, 4, 5, and 6, in that exact order. After, you’ll run—yes, you’re going to have to do a little exercise with this one—to the 25-yard line, do the same, and then run back to the 3-yard line and repeat. Continue this process, and reload as necessary. If you miss the target, do not move on to the next target until you can hit the same target with two rounds in a row.
This drill intends to add a little physical stress to your shooting experience. As always, especially with a drill that requires movement, make sure you are practicing the weapon’s safety. Also, ensure you talk with the range official about the drills you intend on running and make sure they’re okay with it. The last thing you want to do is start running up and downrange with a loaded pistol and freak someone out.
In the end, your time is your score. The lower your score (time), the better you did.
The 1-2-3 Drill
What you’ll need:
- Hitman Target
- At least 6 rounds, 54 if you want to take full advantage of this drill
- 3-yards of range
- Timer
How it works:
For this drill, you’ll want to stand at the 3-yard line, at pistol-ready. When the buzzer goes off you’ll place one round into the 1” square, 2 rounds into the 2” square, and 3 rounds into the 3” square. Repeat until you’re out of target or rounds, in which case, you can work on your reloads.
This drill intends to have you work on speed and accuracy. Continue this drill until you can hit every square without missing.
Importance of Pistol Drills
If you’re not sure, you might be asking what the importance of running pistol drills is. Well, the overarching answer here is accuracy. What’s the point of owning a gun if you can’t hit your target? Let’s say you’re in a self-defense situation. You don’t want to be that guy or gal who shoots his or her foot—that’s a real thing by the way. You also don’t want to be the one to try and save the day during an active shooter and end up missing and hitting the mom holding her crying baby in the background. That’s why practicing these drills is important. Because becoming a better shooter means becoming more accurate.
Proper Pistol Draw
One of the things most overlooked when it comes to weapons/range day is drawing from your holster. Now imagine, you’re out and about and someone pulls a gun on the gas station attendant. You, being the prepared citizen that you are, have a sidearm on, and thankfully you know how to use that sidearm because you’re at the range every Saturday—0800 sharp. However, there’s one thing standing in your way. It’s winter; you have on a big coat, a sweatshirt, and then your pistol. This might not be an issue, but you haven’t practiced, not even once, drawing your pistol from under all your garments inside the holster; the pistol gets caught up, the armed suspect notices you, and you’re the first person he ends up shooting.

This scenario could have gone much differently if you had practiced. Unfortunately, not a lot of people practice, and when they do, it’s rarely from concealed carry. Next time you’re at the range, practice drawing your pistol at least 10 times, without a coat on and then 10 times with a coat on, or from concealed carry—do this unloaded—and make it a habit each time you’re at the range. Some of our drills, which you can find in the Essential Shooting Guide will help to improve your pistol draw
When it comes to actually drawing your pistol from its holster, do so with a firm grip. Place the webbing up as high on the grip as possible and pull directly up along your side. Keep in mind, you shouldn’t be looking at your holster—it’s not the one shooting at you—instead, look at your target, it will increase your speed to target, and hopefully that means you can get the first shot off.
If you’re looking to speed up your pistol draw, check out this article here for a few tips.
Off-Hand Shooting
When it comes to actually shooting your pistol, there are several different techniques you can use. There’s the average shooter’s technique, where you use your strong shooting hand to pull the trigger and your weak hand as support, but then there’s also offhand shooting. Offhand shooting simply means you shoot without your support hand. This might be a little odd for some folks, but with a little practice, you’ll get the hang of it. It’s good to practice shooting like this in case your support hand is ever out of commission, which doesn’t necessarily mean someone shot your hand off, it could just be occupied with a flashlight.
Weak Hand Shooting
Weak hand shooting can be a lot of fun, especially if you’ve never done it. Practice this by placing your strong hand behind your back or on your chest to help with the temptation. But, only use your weak hand when you make the shot. It’s a good idea to practice shooting this way in case your primary shooting hand is out of commission.
Rapid Reload
Most likely, if you need a rapid reload, you’re in the middle of a firefight and your pistol slide locks to the rear revealing you’re out of ammo. You need to reload because bullets are still flying, only not from your pistol. Therefore your goal is to reload as quickly as possible without the target figuring it out.
It’s important in this situation to stay on target. 1. It makes sure you’re able to get back in the fight much quicker without having to reset everything again and 2. It prevents the target from realizing you’re out of ammo until you’re reloaded and sending bullets their way again.
Step 1: Release the magazine with your firing hand—at the same time you’re reaching for a fresh magazine with your non-firing hand.
Step 2: Insert fresh magazine—no need to grab the empty mag off the ground when you’re in the heat of the battle.
Step 3: Release slide forward.
Step 4: Fire!
Tactical Reload
Unlike a rapid reload, a tactical reload happens when you have rounds in the magazine, but you want to reload with a fresh magazine. This typically happens because there’s a lull in the action. You need to be prepared for something else to kick off, but not having a full mag isn’t exactly a smart idea. It’s also not smart to throw what rounds you have away either, so you’ll conduct a tactical reload.
Step 1: Remove your trigger finger from the trigger guard.
Step 2: Grasp your fresh magazine with your support/non-firing hand—between the thumb, index, and middle finger.
Step 3: Bring the new magazine up to your pistol.
Step 4: Press—with your shooting hand—the magazine release button. The magazine should be dropped into your palm, between your pinky/ring finger and the meaty part of your hand beneath your thumb. *Steps 2 and 3 should be happening at the same time as step 4.
Step 5: While holding the old magazine—your magazines will look like they’re in the shape of a “V”—tilt your wrist toward your chest so that the new magazine is under the magazine well and insert (it might look like a backward “L” or “V” turned on its side).
Step 6: Place the old magazine into your pocket or waistband, this way it doesn’t get mixed up with any full mags you have in your magazine pouches.
*Yes, there are different ways of grabbing the old and replacing the new magazine—so before you get your panties in a bunch, we know that—the above is just one example.
Extra Pistol Drills
If you’re interested in our Human Resources target, why not try out this pistol shooting drill.

Once you feel confident about your drills, try the Small Big Small Drill, and see if you can beat our times. Just remember, if there’s no video, it didn’t happen.
You can find more drills to help improve your range day in our Essential Shooting Guide.

Leave a Reply
Your email address will not be published. Required fields are marked *