
Maybe this is getting a bit repetitive, and frankly, we don’t care, but that’s because it’s important. The best target is the one that makes you better. Be honest with yourself; you aren’t getting much out of your range day if you aren’t improving your skills. That’s why it’s important to work with targets that help you improve. So keep reading to learn our picks for the top 5 gun targets to increase your marksmanship.
5 Gun Targets to Increase your Marksmanship
1. IQ Target


The IQ Target is one of our favorites, why, because it requires the shooter to focus on accuracy while testing their ability to think between shots. This means you’re getting more out of your time and not just sending a bunch of rounds downrange.
IQ targets also come as either rifle or pistol targets, so no matter which firearm you’re shooting, you have a target that will work for you. Combine this with the Dead Man’s Hand Shooting Deck—choose between the rifle or pistol deck—and you’ll get even more quality practice while having fun at the same time.

Looking for another target option? Read our blog, The Best Silhouette Targets

The Essentials Target is great to help you maintain your current proficiency and improve areas where you may have a little trouble. When combined with the Essential Shooting Guide, this target will allow you to work on your marksmanship with the pistol through various shooting drills. You’ll find yourself focused on slow aimed fire, weak and off-hand shooting, target transition, trigger speed changes, drawing, magazine reloads, and controlled multiple-shot groups. If this doesn’t give you some good quality range time, we don’t know what will.

Looking for rifle targets? Read our blog, The Best Rifle Targets for your Next Range Day

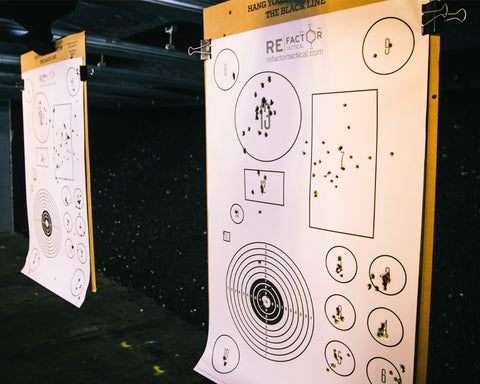
The Hitman Target is great for the long range shooter, considering that’s what it was designed for. The target includes a comprehensive zeroing and engagement system for precision marksmanship. It also comes with a grid overlay system so shooters can see the impact offset and adjust onto different zeroing squares. This not only gives you various points of aim, but it also helps you maintain an MOA zero at 100, 200, and 300 yards. Because if your zero is off, you might have trouble becoming the marksman you so desire to become.

A diagnostic target is excellent for new shooters because it tells you what you’re doing wrong based on where your round hits. If you’re new to firing a weapon, how do you know what you’re doing wrong if no one tells you? If you aren’t taking an official course or working with a trained shooter, this can be a hard task to learn by yourself. Diagnostic targets tell you when you’ve slapped the trigger instead of that slow, steady trigger pull, along with other mistakes you’re bound to make as a new shooter.
Want to add more pistol targets to the collection? Read our blog, Top 7 Pistol Targets
5. Rite in the Rain Weatherproof Long Range Target

Targets that give you several points of aim, especially if they’re smaller areas, can cause you to focus on accuracy a lot more than if you had one big silhouette to shoot at. Rite in the Rain Weatherproof Long Range Targets give you just that. They also come with a target on either side so that you can choose between two common marksmanship exercises. The design was borrowed from the military/competitive design logic, which can help you not only score your shooting but improve it.
Marksmanship Definition
You’ve got everything you need for some quality range time. You’ve purchased several IQ and Essentials Targets and even the Dead Man’s Hand Shooting Deck for the pistol. Nothing can get in your way of becoming the next top shot. Wrong! Shooting isn’t just about the types of targets you’re shooting at. While it is important, that you’re varying your targets and your drills, how you shoot will determine if you’ll get a round on paper. If you want to be a marksman, you’re going to have to master the fundamentals.

However, before we get much further, let’s address this question first. What is marksmanship? There are a lot of people out there who aren’t exactly sure what marksmanship means. Just to be clear, we’re talking about a person who is of particularly good aim, in the case of this blog, with either a pistol or rifle. Depending on whom you talk to, marksmanship may be the difference between shooting 23/40 rounds or 35/40 rounds during military qualifications. Put, however, marksmanship is the ability to hit your target. It’s the precision in your shots that makes you a marksman.
Why is good marksmanship important?
Well, why wouldn’t it be important? The entire point of shooting a gun is to hit the target. Your target may be a piece of paper, a deer, or an intruder. Whatever the case may be, you want to hit it. No one shoots at a target and hopes they miss it. But being able to hit the target isn’t the most important reason to have good aim. Safety is.
Don’t have the finances to buy new targets? Read our blog, Free Printable Shooting Targets
If you can’t hit your target, it doesn’t mean the bullet just disappeared into thin air. When the bullet leaves your gun, it has to impact something. If you’re in a situation of self-defense, the difference between hitting your target and missing could mean the intruder or criminal gets a shot off first. Still, most importantly, it could mean you’re going to hit someone else accidentally. Good marksmanship is important because bad marksmanship isn’t an option. With that in mind, safety is your first step in marksmanship…so let’s talk about that.
Weapons Safety
If you’ve ever taken any weapons course, a good instructor will always start with weapons safety.
Know what’s behind your target
Don’t point at anything you don’t intend to shoot or kill
Don’t place your finger on the trigger until you’re ready to shoot
Always keep your weapon steady and downrange
Don’t joke or jester with your weapon
Treat all weapons as if they are loaded
If you’ve been in the military, you also hear, don’t count your rounds on post, and don’t take apart or clean your weapon on post. But, those don’t apply to the example here so you may continue on.
“Good marksmanship” is important for the same reason weapons safety is important. If your aim is off, you could potentially cause death or harm to someone you didn’t intend to shoot. If you don’t know what’s behind your target, you may hit an innocent bystander. If you point at someone you don’t intend to shoot, you might unintentionally fire your weapon at them.
Read more about The Best Shooting Targets
If you don’t have good aim, you risk safety, and if you’re risking safety, you shouldn’t own a gun. This is why it’s important to get to the range. Never buy a gun for protection and not practice with it. It’s like buying a car before you learn to drive. Instead of buying a brand new car, you’re probably going to wreck; you get a driver’s permit, take a few courses or learn from a parent, get a license, and then buy a car; otherwise, you might crash into someone. Gun ownership is no different. For example, if you’re buying a gun for home protection, the last thing you want to do is buy it and not practice with it, someone breaks into your home, and you shoot your kid standing off to the side instead of the intruder.

Know your weapon, understand how it works, learn how to care for it, how to spot a malfunction vs. a stoppage. Know what you should and shouldn’t do with a weapon. And yes, read the manual that comes with it. This manual teaches you more than safety. It teaches you the details about your weapon, such as how to clean it. Why is it important to understand how to clean your weapon? Because if you don’t clean your weapon, you could cause common issues such as failure to feed or failure to fire, and depending on the situation you’re in when you’re attempting to fire the weapon, could be the difference between life and death.
You should also know how to take your weapon apart. Why? You have to take your weapon apart to inspect it. For example, say your weapon has a hairline crack in the barrel. You don’t want to ever shoot a weapon with defects.
Learn how to let us design your next shooting target
A new pistol or rifle is no exception to inspection. When you get your new rifle, pistol, shotgun, whatever your choice of weaponry may be, make sure you inspect it and know what kind of ammo goes into that weapon. For instance, you wouldn’t want to put .45 into a 9mm pistol. Why is this, you ask, because it could blow up in your face. If this happens, you risk more than a little hearing damage. In addition, you risk your eyesight, fingers, etc. So, don’t be that guy or gal. Know how to shoot your weapon and what to shoot through it, then keep it clean, because, to be a marksman, you have to keep safety in mind, always.
Proper Pistol Grip
With safety out of the way—but always in mind—before you can start your journey into marksmanship, you must know how you hold a pistol. If you don’t grip the pistol hard enough or in the right location, you’ll miss the area you want to hit. Of course, there’s always a chance you will get lucky, but no one wants to leave hitting the target to chance. So when you grip your pistol, do it like you mean it. Hold it tight with the webbing between your thumb and pointer finger as high up into the pistol grip as possible, trying not to leave any space. Keep in mind, while you need a very firm grip, don’t grip it so hard that you’re shaking; this will cause an entirely new set of problems. Your goal is to support the weapon, not squeeze it so hard it pops out of your hand like a wet bar of soap.
Another good rule of thumb is to slightly lock your dominant—hand pulling the trigger—wrist forward. This will keep you from “limp wristing” it. If you do this, you could cause your pistol not to fire. The slide won’t lock back, and while you know you have a full magazine and one in the chamber, nothing will happen. Sometimes, the pistol will fire, but a new round won’t be chambered; yet the slide will return to its normal position, giving you the illusion that a round was chambered.
With your non-dominant hand, you’re going to wrap all four fingers around the fingers of your dominant hand. Don’t grip too hard; this can cause you to pull the pistol down and make you hit low on the target. Next, place your week hand thumb below your dominant thumb. Thumb placement can be up to the shooter’s comfort and level of experience, but whatever you do, don’t cross your weak hand’s thumb behind the dominant hand’s thumb. This could lead to serious injury when the slide cycles. Trust us, this is a mistake you’ll never make twice, and if you listen to us, hopefully, you won’t make it at all.
A second not-to-do is tea cupping. This happens when the shooter holds their hand—like a teacup—under the pistol grip—you’re not having tea with the queen of England here, you’re about to shoot a weapon—and this doesn’t give you the support you need for recoil which could cause you to hit too high on the target, or completely overshoot the target altogether.
Proper Shooting Stance with a Pistol
How you stand when you shoot your pistol is important, so important, it can determine if you even hit the target. Why? Because it’s about balance. If you don’t have balance, even the slightest recoil could throw your round off target, and we don’t want that, especially if you’re looking to be a marksman.
Weaver Stance
There are few stances people typically take when they shoot. We will talk about two of them here. The first is the weaver stance. The weaver stance looks slightly like a boxer. You will face the target, with your dominant side’s foot back slightly and toes canted approximately 45 degrees away from your body.
Because you’re standing in the weaver position, both arms will be bent, causing your pistol to be slightly closer to your face. In addition, your dominant arm will be bent slightly out and away from your body, while your non-dominant arm will be bent, with the elbow toward the ground.
Isosceles Stance
The Isosceles Stance requires the shooter the stand square toward the target. Your feet should be at least shoulder-width apart, or slightly further, pointing toward the target, with both arms extended out equally. This should cause the pistol to line up with the center of your chest. Your knees should also be slightly bent with your upper body leaning forward. Do not lean backward; it doesn’t give you any balance.
How to use the Human Resources Target
How to aim a Pistol
You’re almost there! Pistol in hand, stance mastered, now you just need to figure out how to aim the thing, and then you’ll be well on your way to marksmanship! When you’re aiming the pistol, you’re going to keep the pistol directly out in front of you. None of that side-ways crap either. You may think you look cool, but trust me, you aren’t. You’re more like that idiot who wears his hat sideways because he thinks it looks awesome when really, it just looks like he doesn’t know how to wear a hat—yeah, that’s you. Don’t be that guy. Hold your pistol the right way. Keep your arms straight out in front of you, gripping the pistol as discussed above, but with a slight bend in the arm.
Aim the pistol at the target with equal height, equal light. If you’ve ever taken a pistol course, this may be something you’ve already heard. If you haven’t heard of it before, it just means, make sure your rear sight and front sight post are at an equal height. Equal light refers to the space on either side of the front post, as it lies between the rear sights. There should be an equal amount of light on either side.
Once this is done, you’ll want to focus your eyes on the front sight, with both eyes open. This can be a little difficult for new shooters. When you focus on the front sight, it should make the target blurry. Again, it’s hard to get used to, but it will make you a better shot.
How to Shoot a Pistol
When you go to shoot your pistol, there’s a technique. It’s not just a simple squeeze of the trigger. I mean, yes, that’s what you’re doing, but when you squeeze, you have to do it right, or you might miss the target.
Your first step is to make sure your finger is properly placed on the trigger. You might hear some instructors say, place as little finger on the trigger as possible. What they’re referring to is the meaty or cushiony part of your finger. This is between the tip of your finger and the first joint.
After your finger is properly placed, you will make a slow, steady pull of the trigger. Now, when we say slow, we mean you won’t be slapping or jerking the trigger. Instead, you should follow through. This simply means you pull the trigger back, the gun goes off, and you slowly ride the trigger forward. Your finger should not leave the trigger between shots unless, of course, you’re going to reholster. By following through with your trigger squeeze, you will keep yourself from jerking the trigger, which will cause the round to either go too far left or too far right, depending on what hand you’re shooting with.
What distance should I zero my pistol at?
So far, you know what targets you need; you know how to hold your pistol, how to stand, how to aim your pistol, and how to shoot it. But have you zeroed it yet? Like a rifle, you should zero your pistol when you get it. This is done by aligning the point of impact and the point of aim. If you’re pointing your pistol in one direction and the bullet hits in a completely different area, either you’re not shooting correctly, or your zero is off. To zero your pistol, you should be able to adjust your sights either up and down or left and right, in most cases. If you’re too far left, then you need to adjust the sight to the right. If you’re too high, then adjust the sight lower. Keep making adjustments until your point of aim and point of impact are at the spot. This should be done from a distance of 10-25 yards.
Shooting Drills
It’s quite simple; if you want to get better, you have to practice. Running drills can be a great way to practice and improve your accuracy.
Ball and Dummy Technique
The ball and dummy technique consists of loading a magazine with both live rounds and dummy rounds. You would want a friend to load your magazine for optimal results, so you don’t know when you’re about to fire a live round versus a dummy round. The point of this drill is to let you see if you’re anticipating the shot. You want to shoot every round deliberately, focusing on accuracy, so speed isn’t much of a factor here. If you’re anticipating the shot, the pistol will dip forward, and you’ll be well aware of it if a dummy round comes up. Do this drill several times to help you build up muscle memory and prevent anticipation.
Dry Firing
There’s a lot of debate between gun enthusiasts on whether or not dry firing is a good idea for your gun. In some situations, it’s quite unwise, such as when firing a Rimfire. This is because the firing pin impacts the steel chamber, which in turn damages your firing pin. However, with most modern guns, this isn’t generally an issue. Be cautious, though, because revolvers that have floating firing pins, such as that of the Smith & Wesson, can create firing pins damaged through dry firing.
To help protect your gun in cases where the firing pin could be damaged, you can use a snap cap. In cases where damaging the firing pin may not be an issue, dummy rounds are good for simulation. It also lets you practice magazine reloads. Don’t be one of those guys that get butthurt in this section and write seven paragraphs about all the guns that you shouldn’t dry fire or how it’s all a bunch of bull crap, etc. The above are only a couple of examples; we’re certain there are more; these are just the ones we went with. Do remember, however, every weapon is different; again, this is why it’s important to know your weapon because some can handle dry fire, and others can’t.
Now that all that’s covered, your first step is to make sure your weapon is cleared! This is always the first step before and after doing any type of training, cleaning, arming and disarming with any firearm. After you’ve cleared the weapon, you want to make sure you’re in a safe area—even if the gun is unloaded, no one wants you pointing it at them.
Next, if you’re using dummy rounds, feel free to load them into the magazine. If you aren’t, skip this step. The entire point of dry firing is to simulate firing your weapon without actually firing a round, so dummy rounds aren’t needed but encouraged if working with magazine reloads.
After your weapon is cleared out and chosen between dummy rounds or no dummy rounds, you can focus on the fundamentals. What’s great about dry firing is the ability to work on the basics, such as proper grip, stance, trigger control, sight alignment, and sight picture, all without spending any money. Then, you’ll simply shoot the weapon as if it were loaded while pointing it at a designated target. For some people, dry firing is great for building muscle memory and helping to reduce the flinch, you know, what you get from anticipating the shot. Some claim that by practicing on a weapon without the recoil, they become so used to it, they stop anticipating and, in turn, don’t flinch right before the gun goes off.
1-2-3 Drill
The 1-2-3 Drill, using the Hitman target and a pistol, can be a lot of fun while helping you with precision. On the left side of the target are squares of various sizes. You will shoot one round into the 1” square, 2 rounds into the 2” square, and 3 rounds into the 3” square. If you want to make it more challenging, don’t move on until you’re able to place all rounds on the designated target without missing. Once you can do this, you’ll move the target or yourself further out and repeat.
How to be a Marksman
If marksmanship is your goal—as it should be every shooter’s—there’s a lot of tools, tips, and drills out there for you to use. Just remember, no matter how good you become, the fundamentals will always be important. Even the most experienced shooters still take the time to practice the basics. These basics can be practiced through drills and improved with target practice. Just keep in mind, the target you use can determine the quality of practice you’ll get. To learn more about quality targets, click here.
Need work on your target transitions? Read our blog: This Drill is Designed to help work on your Target Transitions
Leave a Reply
Your email address will not be published. Required fields are marked *