
What’s the Best Shooting Target?
The simple answer makes you better.
The exploding tactical market nowadays is flooded with professional shooters with impressive resumes who serve as trainers. Many of us don’t have the time (or in some cases, the cash), so we must improvise based on our experiences and what resources we have on hand. The trick during any range trip is to maximize your limited time and limited ammo. The best way to do that is with a good target and a range plan.
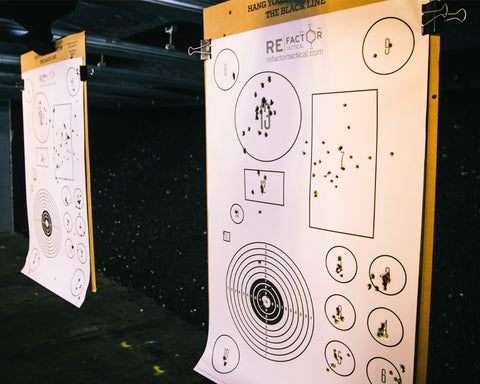
Instant feedback, shot placement indications, ease of transport, and the ability to use it more than once are all traits we look for when setting up our targets. For the discerning gunfighter, targets that make you think can really up the ante… and your quick decision-making abilities. Target discrimination is a key attribute for any shooter, whether it be LEO, MIL, or civilians. In his book “Delta Force,” Charlie Beckwith realized that he didn’t need to test his fledgling, and now famous, unit on if they would shoot. He needed to train them when not to shoot. Below is a list of targets that can help you with everything from bullseye accuracy, speed, and the ever-important target discrimination.


The Top 5 Paper Targets

The Essentials Target is designed to give you an essential set of drills that will maintain your current proficiency level. The drill takes 150 rounds to complete and covers multiple aspects of pistol marksmanship to include slow aimed fire, weak and off hand shooting, target transition, trigger speed changes, drawing, magazine reloads and controlled multiple shot groups.
Want to improve your marksmanship? Read our blog, 5 Gun Targets to Increase your Marksmanship
- Measures: 23″ x 35″
- Unlimited amount of shooting combinations
- Designed to maximize range time
- Made in the USA
This product is designed to be used specifically with our Essentials Shooting Guide.
2. IQ Target:

The IQ Target is designed to create thinking among shooters. The infinite combination of shapes, colors, numbers and letters allows an instructor or student to create a wide variety of shooting problems. Students can be given simple commands such as “shoot all the triangles” or more complex scenarios such as “shoot at the squares and triangles that contain a number.”
Looking for another target option? Read our blog, The Best Silhouette Targets
The idea is it forces the shooter to think and shoot rather than punch holes in paper. The 3 in. shapes make the target suitable for close pistol work or long-range shots. The larger 5 in. shapes are suitable for close-quarters and short-range rifle drills.
- Measures: 23 x 35 in.
- Unlimited amount of shooting combinations
- Pistol targets: 3 in. shapes
- Rifle targets: 5 in. shapes
- Made in the USA

The Kill Zone Target comes with an overlay of the basic human anatomy. This collaborative target with Max Ordinate Academy is designed to give shooters the ability to see how their rounds would affect the human body.
- Measures: 23″ x 35″
- Standard human anatomy design
- Made in the USA
Looking for rifle targets? Read our blog, The Best Rifle Targets for your Next Range Day

The Human Resources Target was developed at the request of a Special Operations unit, to provide an endless supply of drills that include flat range work, as well as shoot-house/CQB training.
Each of the five individual targets is designed with a different shape, color, letter, and number combination. All targets have a head, chest, and thoracic cavity zone, based on the average human height and width of each area.
How to use the Human Resources Target
By establishing a diverse set of targets that vary in combination, instructors and shooters can easily develop an infinite number of drills that are focused on their specific type of shooting. Advanced shooters can rehearse specific tactical scenarios, while beginners can work through the fundamentals of shooting.
- Measures 23 x 35″
- Infinite number of shooting combinations
- Anatomically correct “Kill Zones”
- Made in the USA
The Hitman Target is designed to offer long-range shooters a comprehensive zeroing and engagement system for precision marksmanship. Printed with a grid overlay system in both Metric and US/Imperial measurements, shooters can see their impact offset and be adjusted onto different zeroing squares. The squares have been sized 1-3″ for maintaining a 1 MOA zero at 100, 200, and 300 yards with precision aiming points at their centers. They have also been colored to contrast with red and black reticles for improved sight picture. Lastly, the target can be rotated 90º for MILDOT measurements for wind call adjustments.
Want to add more pistol targets to the collection? Read our blog, Top 7 Pistol Targets
- Measures: 23″ x 35″
- Metric and US/Imperial units of measure
- Grid overlay system
- Made in the USA
The Best Paper Targets for Shooting
While we have our recommended paper targets for shooting, at the end of the day you need to find a target that can fully optimize your range time. If your target is a simple bullseye you will find it hard to conduct multiple drills. Choose a target that’s going to give you plenty of different options for drills. We recommend looking at your end goal such as getting faster, shooting more accurately, or both and then selecting a target that best suits your needs.
Cheap Shooting Targets
If you’re looking for a cheap day at the range, a great place to start is with your targets. If you need more range time, but can’t swing the bill for targets—because you spent all your money on beer and bullets—then there are a few cheap alternatives to those more expensive targets.
Paper targets tend to be some of the cheaper targets on the market. Not to mention, the quality and quantity of paper targets you can purchase vary extensively. There are paper targets that let you know when you hit the target, such as splatter targets. There are paper targets for zeroing, such as the grid overlay targets. There are paper targets used for games and targets simply used to help improve your precision. They even make weatherproof targets—so you can practice for the zombie apocalypse during the next hurricane. We don’t advise this.
Don’t have the finances to buy new targets? Read our blog, Free Printable Shooting Targets
Simply buying paper targets vs. a steel target can save you a lot of money short term. If you need something for right then, paper targets are great. You don’t have to worry about your round ricocheting off the steel target—though knowing what’s behind your backdrop is still a huge deal. Paper targets can also be a great option for your cheap day at the range because it’s easier to purchase paper targets in bulk.
Bulk paper targets
If you’re looking for a cheap target option, buying your favorites in bulk can help alleviate some of the cost. Here’s a list of some well-known targets, which you can buy in bulk.

Big Dawg Targets are great for shooters who enjoy using the same target—although we recommend changing it up a bit—and with 250 3” adhesive targets, you won’t run out anytime soon—at least not within the hour. This target is also a splatter target, meaning you can see where your rounds land without having to walk all the way downrange.
Champion Redfield Style Precision Sight-In Target

The Champion Redfield Style Precision Sight-In Target claims to be made of the highest quality material. It’s also a pretty recognizable target. It’s great for conforming sight-in groups and the small diamond targets can be used to test the results of various ballistic loads. It also comes in a pack of 100, which saves you a little money over buying one target at a time.
Learn how to let us design your next shooting target
Rite in the Rain Weatherproof 25 Meter Target

If you’ve served any time in the military, you recognize this target for zeroing your rifle. Did you know it was also weatherproof? If not, now you do. This 25-meter target is great for zeroing an M16A2/A4 or M4 Carbine, and with its grid overlay, makes MOA adjustment a lot easier. This particular purchase also comes in a 100-pack sheet, again, only saving you more money.
The Best Range Targets

When going to the range, try to find targets that will keep you from wasting ammo and will maximize your time. Using the RE Factor Tactical Essentials and IQ Targets allows you to go to the range without having to spend a bunch of time planning out your training. We like to use “The Essential Shooting Guide” to give our range trips a little structure. It also allows us to tailor our limited training time to what we need to work on for the day, such as a precision pistol at 25m or quick rifle transitions with a modified El Presidente drill. Both of these targets also allow us to set up and take down fairly quickly, which leaves us more time to focus on shooting. The Essentials Target, when used in conjunction with The Essential Shooting Guide, allows you to track my progress through gated assessments as well. This is perfect for anyone looking to really work on specific parts of their shooting.
How to Build a Target Stand
Several different methods for building target stands exist, but this plan is inexpensive, mobile, and easily constructed. After a quick trip to your local hardware store, head back to your garage, crack a cold one, crank up the Iron Maiden (Texas country is also acceptable), and assemble your target stand in a matter of minutes.
Equipment required:
Item | Amount |
2”x4”x24” | 4 |
1”x4”x48” furring strips | 3 |
3” deck screws | 10 |
Staple gun & staples | 1 & 8 |
24”x36” cardboard backing | 1 |
Directions:
- Begin by assembling your supplies
- Place 2×4 “A” on the ground, with the 4” side upright
- Using a pencil, measure 11 ½” from each end. Ensure to mark on the top and side of the 2×4.
- Drill two pilot holes at the 11 ½” mark on the 4” side of the 2×4.
- Place 2×4 “B” perpendicular to “A” and line it up with one set of 11 ½” pilot holes.
- Use two of the 3” deck screws and attach “A” and “B” using the pilot holes.
- Repeat this step and attach “C” to “A”.
- You should now have one 2×4 attached to two 2x4s with a 1” gap in the middle of “B” and “C.”
- Cut one of your 1”x4” furring strips down to 16”.
- Slide the 16” furring strip between “B” and “C” so that there are 4” of clearance between your furring strip and “A.”
- Repeat steps 3-6 with 2×4 “D.”
- Take the two remaining deck screws and affix “C”, “D”, and the furring strip together 3” from the end of each side of the furring strip.
- Staple the 24”x36” piece of cardboard to the remaining 4” face of the two remaining furring strips.
- Place the cardboard and furring strips into the stand made from pieces “A-D”.
- Place sandbags or weights on the target stand in high winds.
Best Shooting Target Games

Competition breeds success in everything, not just sports. In the eternal words of Saint George S. Patton Jr. “Americans love a winner and will not tolerate a loser.” The classic end of the week beer shoot off in team rooms everywhere are sacred for a couple of reasons: it’s an easy and effective way to test your skill man to man, it adds a little simulated pressure to jack up your heart rate and force you to focus, and (my personal favorite) bragging rights over your teammates or buddies in the form of the loser buys the libations. I highly encourage everyone to end their day with a quick bout of “mano y mano” with your buddy in some good-natured fun. Try these games to have some fun and measure your skill against someone else and not just the clock:
Human Resources Target: The Hammer Drill
The shooter stands at the 7m line. At the buzzer, the shooter fires 1 round to the T box, 2 rounds to the chest, and 3 rounds to the pelvic triangle. These are performed using our Human Resources Target.
IQ Target: Numbers Game
Engage all COLORED shapes with a number inside of it. The number in the middle determines the number of rounds that shape receives. The shooter with the best time wins. A 1-second penalty is added for each miss or improper round count. These are performed using our IQ Targets.
Kill Zone Target: 5 x 5 Drill
The shooter stands at the 5m line. At the sound of go, the shooter fires 5 rounds to the A Zone, reloads, and then fires 5 rounds to the B Zone. These are performed using our Kill Zone Target.
Hitman Target: 1-2-3 Drill
Fire 1 round into the 1” target, 2 rounds into the 2” target, and 3 rounds into the 3” target. Fastest time wins.

Exactly like cricket in darts, but with bullets. We recommend using one target per team to help keep score. If you need a quick refresher on how to play, here’s a link to an easy to understand cricket breakdown, though the instructions are also on the bottom of the target: https://www.darting.com/Darts-Rules/Cricket/
Once you feel comfortable with your skills, we encourage you to try out some local competition with your friends. Go with the mindset of having fun and improving. Don’t get intimidated by the rules or fancy guns you see there, you’ll likely impress yourself with how you’ve progressed.
International Defensive Pistol Association: http://www.idpa.com/
United States Practical Pistol Association: https://uspsa.org/
3 Gun Nation: https://www.3gunnation.com/
Best Long Range Target
![]()
Zeroing your rifle without a spotter is fairly tough, especially at longer distances. For that purpose, we prefer the Hitman Target. Just grab a spotting scope and use the handy measuring feature running the length or height of the target to measure from the bench. My favorite feature is that it’s hashed for MOA and MILs, which allows for every shooter to use this regardless of their preference for MOA or MIL. It’s also nice to get your Data On Previous Engagement (DOPE) by confirming your zero out to 300m using the 1”, 2”, and 3” targets. This worked particularly well when re-zeroing my Mk12 build. The color contrast actually did help, especially with an illuminated TMR reticle.
Best Steel for Rifle Targets: AR500 Targets
AR500 is a specific type of steel, you can shoot. Unlike some steel, which is too hard, causing the round to ricochet and potentially cause life-threatening injuries—AR500, depending on its cut will withstand different calibers. With this being said, just because it’s AR500 grade steel, does not mean you can shoot whatever you want at it, from whatever distance. With rifles in mind, AR500 steel comes in three major cuts, 3/8”, 1/2” and 3/4”. If you want to shoot a rifle with a caliber up to .308, then 3/8” will work. However, if you’re thinking about shooting a .338 magnum rifle, you’ll have to invest in some 1/2” steel targets. Now, let’s talk about 3/4” steel. Because this steel is much thicker than the other AR500 steel targets mentioned above, it is also quite a bit more expensive. Of course, prices vary based on the size of steel and company you order from. The good news is; this steel can handle much higher calibers, such as .408, .416, and 50 BMG.
Need work on your target transitions? Read our blog, This Drill is Designed to help work on your Target Transitions
Something to keep in mind: When you purchase your steel target, don’t buy more than you need! This is just a really stupid idea. If you don’t plan on shooting a .50 Browning machine gun, because you only have a .308, then there’s no point in buying an AR500 3/4” steel target. All you’ll be doing is wasting your hard-earned cash, and you won’t be any better off for it.
Here’s a list of steel targets you can purchase, based on your caliber:

Highwild laser cuts a 3/8” steel target meant to withstand calibers up to a .308, including .223, 5.56, 5.54×39, 7.62×39, and other similar rounds. If you’re shooting at this target with a rifle, simply make sure you’re a minimum of 100 yards away. The 3/8” AR500 steel target is also capable of handling the impact of magnum handguns.
AR500 1 Silhouette Steel Shooting Target & Full Portable Stand

Ar500 Target Solutions makes a 1/2” steel silhouette shooting target. What’s nice about this is, it comes with a portable stand that’s easy to put together. The 1/2” steel will handle daily rifle use, including the impact from .300 and .338 magnum rifles. The target is also set at a 20% angle to deflect shrapnel.
XSteel 3/4″ AR500 12″ X 20″ Torso

When buying steel targets, remember—steel isn’t the cheapest metal. Meaning, the thicker your target is, the more money it’s going to cost. So, if you don’t need it, don’t get it.
The XSteel Torso Target is meant to stand up to a .50 BMG, .416, and a .408. Keeping safety in mind, if you’re using .50BMG, ball, or solid brass ammo, you’ll need to be a minimum of 300 yards away, but 400 yards is preferred.
Targets for Sighting in Rifles
Following weapons safety, inspecting and cleaning your weapon, and doing your function checks, zeroing may be the next most important part of owning a rifle. Otherwise, who knows what you might hit. With that being said there’s a lot of tools out there to help you sight in your rifle some for boresighting or simply to hold the rifle steady in an attempt to prevent human error. There are also some pretty great targets out there you should add to your range bag for zeroing day.
The Hitman Target is designed to offer long-range shooters a comprehensive zeroing and engagement system for precision marksmanship. If this is you, the printed grid overlay system in both Metric and US/Imperial measurements are a must. The target allows you to see the impact offset and then adjusted onto different zeroing squares. The squares have been sized 1-3″ for maintaining a 1 MOA zero at 100, 200, and 300 yards with precision aiming points at their centers. They have also been colored to contrast with red and black reticles for improved sight picture. The shooter can even rotate the target 90º for MILDOT measurements for wind call adjustments.
The Long-range target comes with a standard long-range bullseye. It also includes a “T” box, used as a sniper qualifier by many local, state, and federal police agencies. Under the target are 1, 2, and 3″ squares used as an MOA zero at 100, 200, and 300 yards. So, if you’re looking for sniper precision, this is the perfect zeroing target for you.
3. EZ2C Red Dot Optics Style 5

The EZ2C is meant to help zero in your optic sights. You can buy this style of target fairly cheap and still benefit from it. EZ2C uses a bright green center for their targets so there’s a contrast between your sights and sight picture.
Custom Shooting Target
RE Factor Tactical can customize any target needed. We have designed several targets for various law enforcement agencies as well as Special Operations units. We can either take your existing design and print it or customize a design based on the needs of your individual unit or agency. If you would like us to customize a target for you, please contact [email protected].
Best Hostage Target

We have literally been shooting at the “hostage target” since our dads first started taking us to the range. The type was the standard, “shady-looking bad guy holding a gun to a hostage’s head” which meant that only a small portion of the target itself was usable. Those were great for the John McClane reenactments we all love, but not so great for usability after that. The Human Resources Target though offers much, much more. The “T” box, or the area that has a high probability of immediately incapacitating a threat, is prominently displayed along with corresponding chest and thoracic cavity zones. These targets were actually specifically requested by a Special Operations Force (SOF) unit to provide any number of scenarios to test operators’ ability to get good hits quickly. If you’re lucky and you have access to a range with a shoot-house, you can set these up throughout the house with specific rules of engagement to stress the importance of target discrimination. “Only shoot green shapes” or “Numbers are non-threats” are simple scenarios designed to test your thought process and in the end make you think before you shoot.
Best Targets for the Tactical Shooter

For the tactical style shooters, particularly the MIL and LEOs out there, take a hard look at the Kill Zone target. It’s great because it gives you a real look at exactly what your rounds are affecting within the human body. On this target, the human body is overlaid against a standard-sized IDPA target for the competitors out there too. The Essentials Shooting Guide, used in conjunction with the Essentials Target, is a fantastic resource for everyone from beginners to master-level competitors to tactical shooters. A timer is required for several of the drills, but as previously stated, you can download a free shot timer from your smartphone.
Targets that make you become a more accurate shooter

We started this rodeo with a simple question: what makes a great target? This is the answer: a great target enables you to get accurate hits in a shorter amount of time. Any range trip where you don’t improve one modicum of your skillset is wasted potential. Luckily, a few assets can help ensure we reach our potential after each range visit. The Essential Shooting Guide, from start to finish, is a fantastic resource to hone your skillset. Consisting of 11 chapters, the guide will improve your shooting with incremental assessments. Each chapter details another aspect of your pistol and/ or rifle shooting, laying out drills to improve general marksmanship, bullseye, draws, transitions (rifle to pistol and between targets), trigger manipulation, and facing movements. Our favorite part of each drill is that the guide tells you exactly what you’re trying to achieve. The “End Game” in the rifle to pistol transition states:
“Here you are practicing your transition from rifle to pistol. You are also building the muscle memory to plus up your weapon systems after both have gone dry in a manner that helps keep you partially in the fight. You should avoid holstering your pistol dry and then conducting a magazine reload. The reason for this is because your rifle may have gone dry from a malfunction or from running out of ammunition. You should always have at least 1 weapon system back up and ready for the fight before fixing the next.”
Anyone who’s been in the military can tell you that the “so what” of the training, the real reason for doing it, is pivotal to buy-in from everyone from the lowest ranking Joe to the NCO actually tasked with conducting the training to whichever officer will rave about it in the summary to the commander.
You can accomplish every drill in the book as long as you can pace out 25m, but to really maximize the lessons you need the Essentials and Kill Zone Targets.
The IQ Target makes you search for the right target, focus on the fundamentals to maintain accuracy, and remember your engagement criteria. Along with the IQ Target as a useful range tool, is the Dead Man’s Hand deck. You can pick them up in either rifle or pistol variants. Each deck has 52 drills that are used in conjunction with the IQ Targets. The drills vary by difficulty, distance, and starting position. All of the drills are fun and include different aspects of your shooting skills.

For example, the 7 of Clubs for the rifle deck has the shooter starting from the 3-yard line in the high ready. At “GO,” the shooter engages 1 round to green circle B, 2 rounds to blue square 1, 3 rounds to red square 2, 2 rounds to blue square 1, and 1 round to green circle B. These drills are a lot of fun to end the range trip on, especially with a friend. My range buddies and I like to perform 10 pushups or 15 air squats before each round to get the heart rate up and really focus on the basics (breathing, gradual trigger squeeze, feeling the reset, etc).
Marksmanship Definition
You’ve got everything you need for some quality range time. You’ve purchased several IQ and Essentials Targets and even the Dead Man’s Hand Shooting Deck for the pistol. Nothing can get in your way to becoming the next top shot. Wrong! Shooting isn’t just about the types of targets you’re shooting at. While it is important you’re varying your targets and your drills, how you shoot will determine if you’ll actually get a round on paper. If you want to be a marksman, you’re going to have to master the fundamentals.
However, before we get much further, let’s address this question first. What is marksmanship? Apparently, there are a lot of people out there who aren’t exactly sure what marksmanship means. Just to be clear, we’re talking about a person who is of particularly good aim, in the case of this blog, with either a pistol or rifle. Depending on whom you talk to, marksmanship may be the difference between shooting 23/40 rounds or 35/40 rounds during military qualifications. Plainly put, however, marksmanship is the ability to hit your target. It’s the precision in your shots that make you a marksman.
Why is good marksmanship important?
Well, why wouldn’t it be important? The entire point of shooting a gun is to hit the target. Your target may be a piece of paper, a deer, or an intruder. Whatever the case may be, you want to hit it. No one shoots at a target and hopes they miss it. But being able to hit the target isn’t the most important reason to have good aim. Safety is.
If you can’t hit your target, it doesn’t mean the bullet just disappeared into thin air. When the bullet leaves your gun, it has to impact something. If you’re in a situation of self-defense, the difference between hitting your target and missing could mean the intruder or criminal gets a shot off first, but most importantly, it could mean you’re going to accidentally hit someone else. Good marksmanship is important because bad marksmanship isn’t an option. With that in mind, safety is your first step in marksmanship…so let’s talk about that.
Proper Pistol Grip
With safety out of the way—but always in mind—before you can start your journey into marksmanship, you have to know how you hold a pistol. If you don’t grip the pistol hard enough or in the right location, you’ll miss the area you want to hit. Of course, there’s always a chance you will get lucky, but no one wants to leave hitting the target to chance. When you grip your pistol, do it like you mean it. Hold it tight with the webbing between your thumb and pointer finger as high up into the pistol grip as possible, trying not to leave any space. Keep in mind, while you need a very firm grip, don’t grip it so hard that you’re shaking, this will cause an entirely new set of problems. Your goal is to support the weapon, not squeeze it so hard it pops out of your hand like a wet bar of soap.
Another good rule of thumb is to slightly lock your dominant—hand pulling the trigger—wrist forward. This will keep you from “limp wristing” it. If you do this, you could cause your pistol not to fire. The slide won’t lock back, and while you know you have a full magazine and one in the chamber, nothing will happen. Sometimes, the pistol will fire, but a new round won’t be chambered; yet the slide will return to its normal position, giving you the illusion that a round was chambered
With your non-dominant hand, you’re going to wrap all four fingers around the fingers of your dominant hand. Don’t grip too hard, this can cause you to pull the pistol down and make you hit low on the target. Next, place your week hand thumb below your dominant thumb. Thumb placement can be up to the shooter’s comfort and level of experience, but whatever you do, don’t cross your weak hand’s thumb behind the dominant hand’s thumb. This could lead to serious injury when the slide cycles. Trust us, this is a mistake you’ll never make twice, and if you listen to us, hopefully, you won’t make it at all.
A second not-to-do is tea cupping. This happens when the shooter holds their hand—like a teacup—under the pistol grip—you’re not having tea with the queen of England here, you’re about to shoot a weapon—and this doesn’t give you the support you need for recoil which could cause you to hit too high on the target, or completely overshoot the target altogether.
Proper Shooting Stance with a Pistol
How you stand when you shoot your pistol is important, so important, it can actually determine if you even hit the target. Why, because it’s about balance. If you don’t have balance, even the slightest recoil could throw your round off target, and we don’t want that, especially if you’re looking to be a marksman.
Weaver Stance
There are few stances people typically take when they shoot. We will talk about two of them here. The first is the weaver stance. The weaver stance looks slightly like a boxer. You will face the target, with your dominant side’s foot back slightly and toes canted approximately 45 degrees away from your body.
Because you’re standing in the weaver position, both arms will be bent, causing your pistol to be slightly closer to your face. Your dominant arm will be bent slightly out and away from your body, while your non-dominant arm will be bent, with the elbow toward the ground.
Isosceles Stance
The Isosceles Stance requires the shooter the stand square toward the target. Your feet should be at least shoulder-width apart, or slightly further, pointing toward the target, with both arms extended out equally. This should cause the pistol to line up with the center of your chest. Your knees should also be slightly bent with your upper body leaning forward. Do not lean backward, it doesn’t give you any balance.
How to aim a Pistol
You’re almost there! Pistol in hand, stance mastered, now you just need to figure out how to aim the thing, and then you’ll be well on your way to marksmanship! When you’re aiming the pistol, you’re going to keep the pistol directly out in front of you. None of that side-ways crap either. You may think you look cool, but trust me, you aren’t. You’re more like that idiot who wears his hat sideways because he thinks it looks awesome when really, it just looks like he doesn’t know how to wear a hat—yeah that’s you. Don’t be that guy. Hold your pistol the right way. Keep your arms straight out in front of you, gripping the pistol as discussed above, but with a slight bend in the arm.
Aim the pistol at the target with equal height, equal light. If you’ve ever taken a pistol course, this may be something you’ve already heard. If you haven’t heard of it before, it just means, make sure your rear sight and front sight post are at an equal height. Equal light refers to the space on either side of the front post, as it lies between the rear sights. There should be an equal amount of light on either side.
Once this is done, you’ll want to focus your eyes on the front sight, with both eyes open. This can be a little difficult for new shooters. When you focus on the front sight, it should make the target blurry. Again, it’s hard to get used to, but it will make you a better shot.
How to Shoot a Pistol
When you go to actually shoot your pistol, there’s a technique. It’s not just a simple squeeze of the trigger. I mean, yes that’s what you’re doing, but when you squeeze, you have to do it right, or you might miss the target.
Your first step is to make sure your finger is properly placed on the trigger. You might hear some instructors say, place as little finger on the trigger as possible. What they’re referring to is the meaty or cushiony part of your finger. This is between the tip of your finger and the first joint.
After your finger is properly placed, you will make a slow, steady pull of the trigger. Now, when we say slow, we mean, you won’t be slapping or jerking the trigger. Instead, you should follow through. This simply means, you pull the trigger back, the gun goes off and you slowly ride the trigger forward. Your finger should not leave the trigger between shots unless of course, you’re going to reholster. By following through with your trigger squeeze, you will keep yourself from jerking the trigger, which will cause the round to either go too far left or too far right, depending on what hand you’re shooting with.
What distance should I zero my pistol at?
So far, you know what targets you need, you know how to hold your pistol, how to stand, how to aim your pistol, and how to shoot it. But, have you zeroed it yet? Like a rifle, you should zero your pistol when you get it. This is done by aligning the point of impact and the point of aim. If you’re pointing your pistol in one direction and the bullet hits in a completely different area, either you’re not shooting correctly or your zero is off. To zero your pistol, you should be able to adjust your sights either up and down or left and right, in most cases. If you’re too far left, then you need to adjust the sight to the right. If you’re too high, then adjust the sight lower. Keep making adjustments until your point of aim and point of impact is at the spot. This should be done from a distance of 10-25 yards.
Range Safety
- Always keep the gun pointed in a safe direction.
- Always keep your finger off the trigger until ready to fire.
- Always keep the gun unloaded until ready to use.
- Always know your target and what is beyond.
- Know how to operate a gun safely.
These are fairly standard range rules. If you stick to these, you will be safe and keep others safe as well. Our advice is to never take your gun or your skills for granted. Overconfidence causes a lot of accidents, so don’t be the guy who has an accidental discharge with your .44 magnum while trying to show off. Some ranges allow you to maneuver around so long as you maintain good muzzle awareness. Some ranges won’t even allow you to shoot faster than a 1 round per 1-second cadence. If your home range is more restrictive, be respectful, and follow the rules. Modify your drills if you have to or ask permission. If you’re new, follow the rules and go with someone you trust to show you the ropes. If you happen to be one of the folks who someone else is relying on, be extra careful and harp on the details of range safety. We’ve grown up around firearms our entire lives and now we work with them on a daily basis, but we are still as unbending as an iron rod for safety. Another rule that we grew up with to really etch the gravity of firearm safety is this: never point a gun, unloaded or not, at anything you’re not willing to destroy.
Despite what the “let’s eat Tide Pods” generation says, the National Rifle Association (NRA) is actually a great resource for gun safety. Follow this link to learn more about firearms safety: https://gunsafetyrules.nra.org/
Leave a Reply
Your email address will not be published. Required fields are marked *